
We are on holiday with my cousins. The time is slowly ticking away but we can’t stop to catch a glimpse of the chanting birds above our heads. Luckily, we have our binoculars around our necks so the job shouldn’t be difficult at all.
Suddenly, I spot a Hoopoe and as I shout and rush to grab my bino, my cousin grabs hers. She wants to track the bird too. As it turns out it is a great sight to behold.
Then out of the blues, my cousin grabs my binoculars with a mocking grin that suggests I am faking the experience. But as she pushes the binoculars to her eyes, she suddenly realized how clear my bino is.
A debate ensues and we have to go back and forth to determine who has the best optics. I take the trophy home.
How did I do it? Simple, I knew what most people don’t know about quality binoculars. These are the exact things that I am going to share with you today.
Determining the Quality Glass
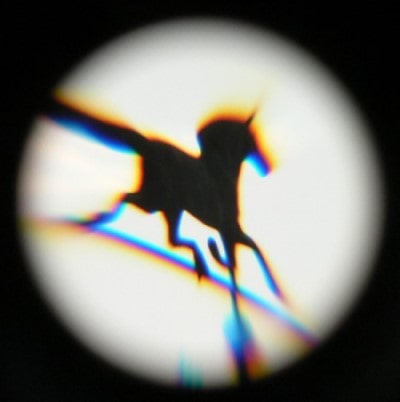
Image: Rainbow Edge or Chromatic Aberrations
Quality binoculars often come with ED or HD glass. High-quality optics don’t produce much rainbow colors around the image. Actually, there are no such binoculars that are entirely free of rainbow edges (more correctly chromatic aberration) but the quality optics give minimal effect.
To easily determine if your binoculars give rainbow edges or chromatic aberration look at a dark object on a light background or a light object on a dark background. If you see the visible amount of rainbow edges your optics are not of high quality.
Check out for Distorted Image

Almost all binoculars show some sort of distortion in the view. But if the distortion is too severe then it may be due to the poor-quality optics. Distortion is mostly visible near the edge of the field of view. There are two types of distortion: pincushion distortion and barrel distortion. Check out if your binoculars give distorted images that are easily noticeable.
A small amount of pincushion distortion may be desirable especially to eliminate the nauseating rolling ball or globe effect but that shouldn’t be quite noticeable. However, for astronomy binoculars, this rolling ball effect doesn’t have any benefit at all.
Check Out for Double Image/Eye-strain
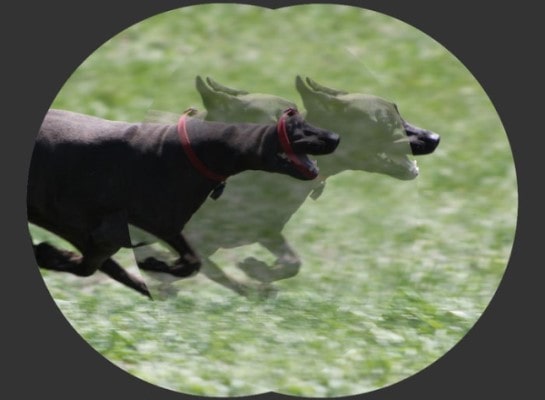
Image: Binoculars Double Image
Quality binoculars don’t produce double images. Sometimes the double images are not noticeable, yet you may get eye strains due to the poor optical alignments (collimation). If your binoculars give a double image or cause eye-strain for prolonged uses that must be for the poor collimation of optics.
Determining Prism Size and Glass Type
The prisms are one of the first things manufacturers skimp on when trying to lower the price. Quality binoculars come with full-sized high-quality Bak 4 prisms. Seeing ‘shaded’ exit pupils is a sign of lesser-quality or undersized prisms. An undersized and/or BK7 prism does not transmit light effectively and produces a dimmer image.
How to Determine the Undersized Prism
Take your binoculars and hold it away from your eyes. Then point it towards a relatively bright object such as the open sky or any light source. Do not point towards the Sun. You will notice a bright circular light in your eyepieces.
The circular light should be a perfect circle and not a diamond shape. If it is more of a diamond shape with very opaque segments around it, it indicates the use of undersized prisms, which is an indication of cost-cutting.
Determining the Glass Type of Prism
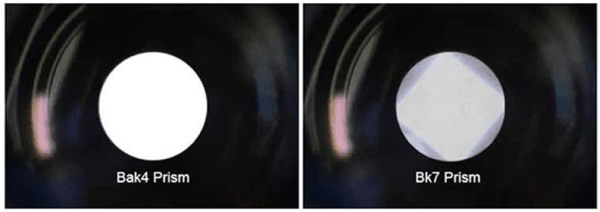
Image: Bak4 Vs BK7 Prism
If you notice some gray segments around this diamond-shaped circle that’s an indication of BK7 glass. Prisms from BK-7 glass materials give you dimmer images.
False/Ghost Images and Light Flares
Point your binoculars toward a small and bright source of light such as a round ceiling light, or a mobile flashlight. As you move the binoculars out of the field of view check if you get any other additional image.
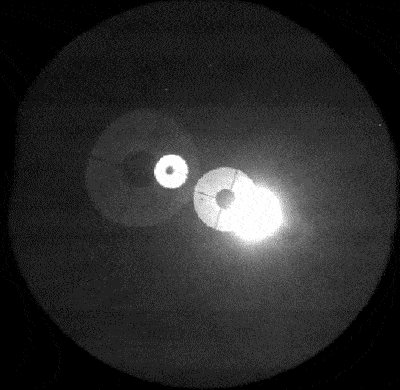
Image: Three False or Ghost Images left to the main light source
If you see any false or ghost images around the original image, this is an indication of poor or absent internal coatings or poor baffling.
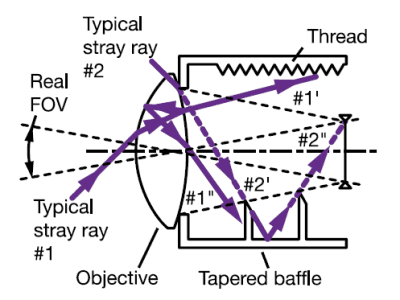
Image: Flares of light is checked by internal threads or a ring of Tapered Baffle
On the other hand, if you see flares of light even when the light source is out of the field of view, it might be an indication of poor baffling or poorly designed objective tube.
Check for Vignetting (Loss of light)
Vignetting is the loss of light around the edge of an image or the field of view. This is usually not visible in daytime observation but most common while observing celestial bodies in the night sky. It is most common in budget binoculars.
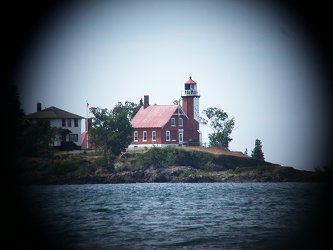
Image: Vignetting of Image
Mild vignetting is difficult to test in daylight situations but if you notice any observable loss of light around the edge of the image it is an indication of a poor optical system and may be severe while stargazing. Usually vignetting occurs when the light is impeded to enter the optical system. The use of larger lenses and full-sized prism may lower the effect of vignetting.
Check for Anti-reflective Coatings
The spec that almost all binocular manufacturers promote for their scopes is the ‘anti-reflective coating’. These coatings (usually of magnesium fluoride) are applied onto all glass surfaces to improve light transmission for the brighter images. The coatings can be single-layered (in budget binoculars) or multi-layered (in quality binoculars). When all air-to-glass surfaces are treated with multiple layers of coating it is called Fully Multicoated (FMC), and when some air-to-glass surfaces are treated with multiple layers of coating it is called Multicoated (MC). When a single-layer coating is used it is called either Fully Coated (all air-to-glass surfaces are treated), or simply Coated (not all air-to-glass surfaces are coated).
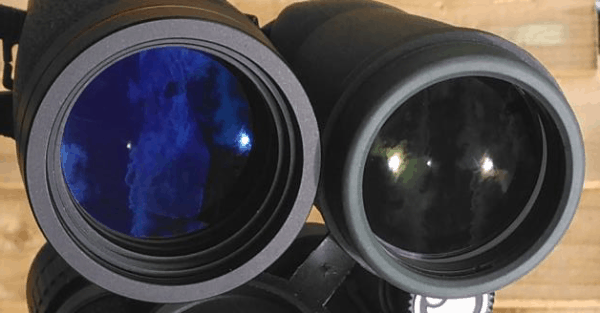
Image: Fully Multicoated (left) Vs Single Layer Coating (right)
You can easily determine what type of coatings are applied in your binocular optics. Keep your binoculars outside but not under direct sunlight. Observe the intensity of refection. If the reflected sunlight is very small (left image) this is an indication of well-applied coating, if the reflection is more intense (right image) then the probability is either a single-layer coating or no coating at all.
Estimate the Size of Exit Pupil
Quality binoculars always give you the true exit pupil. Lower priced binoculars may use a diaphragm in between the objective lens and the eyepiece. This diaphragm lowers the actual size of the exit pupil. In that case, the mathematical calculation (objective/magnification = exit pupil) doesn’t reflect the practical exit pupil.
**The diaphragm is used to reduce the image distortion caused by the edges of the lens that has been poorly ground**
Test your Binoculars for Stargazing
The binoculars that you use for daytime observation may not be suitable for nighttime stargazing. While stargazing with binocular you may find the stars get increasingly distorted toward the edge of the field of view. Instead of seeing sharp bright spots you may see distorted smears. Almost all binoculars give this distorted image, which is called Coma. With quality optics, you will get a minimal amount of Coma.
Focus on Build Quality
Binoculars that have better build quality may have undergone a critical quality control test. Binoculars that have loose screws, loose covering material, scuff marks, damaged head, dusty cover, or an internal baffling may have not undergone quality control checks. Those bad quality binoculars might have poor collimation and may not give you the best image quality. Take your time to ensure that the binoculars you are going to buy have good build quality.
Shake Hard to Find Any Movement Inside
As quality binoculars undergo proper quality control tests, they shouldn’t have any loose screws, poor lens alignments or any other loose parts. If you have a pair of binoculars, give it a good shake. If nothing moves inside, it is a good sign. But if any component moves, chances are that the optics will not give you the right image.
Run Focus Though Its Full Range
Move your binocular’s focus wheel to its full range. When you do this, you should get a uniform feel throughout the binocular’s range.
If the focus system is stiff, getting a precise focus will be hard. On the other hand, if the focus system is loose, maintaining the focus setting will be a nightmare. Let me show you how this works.
This behavior is an indication of poor manufacturing mechanical tolerance. There should be no rough feeling in dynamic or static friction at all.
Watch Out for the Rock on Bridge
If your binoculars are the Porro prism design check the bridge that connects the two eyepieces. If the bridges rock too much even with the slightest movement it may change the focus.
That’s why it is important to pay attention to the extent of rocking. On a properly constructed device, the rocking should be minimal. The minimal rocking is achieved by a quality control test.
Interpupillary Distance (IPD) Setting
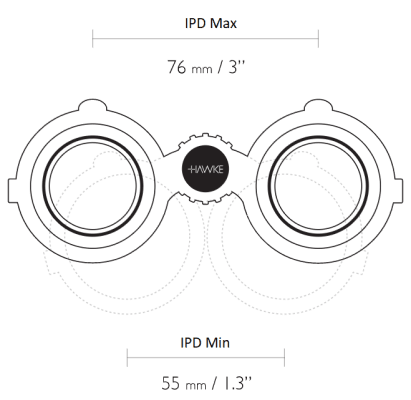
Image: Interpupillary distance (IPD)
Some binoculars may not cover the IPD ranges for all users. While the IPD range of adults are considered to lie between 43 and 80 mm at a mean of about 65 mm, most IPD settings don’t go through the entire range. Instead, they only cover up to a maximum of 10 mm deviation from the mean.
Unfortunately, this deviation isn’t enough to cater for the ten percent of the people. Due to this, it is important to determine your IPD and get a binocular that suits you before you buy.
You must be wondering how you have missed these simple tips all through your bino-life. Well, it happens. I didn’t also learn them on a single day. It takes time. Thankfully, you now have each one of them.